In this tutorial, we’ll show you how to customise the appearance of your Facebook Dynamic Ads with the use of custom templates.
Facebook Dynamic Ads are the best way to reach your KPIs, and they are ideal for prospecting and remarketing. In a News Feed filled with ads, you need to make sure that your Dynamic Ads stand out! Here’s how to do just that, catching the attention of your potential clients, and increasing your CTRs – and potentially your conversion rate!
So, let’s begin. You have to know that you can customise your ads to “match” a particular holiday (i.e. Christmas, Valentine’s day), to include your logo and raise brand awareness, or to promote any special promotions you might have going on.
Here are some things that you can customise:
- The area around your products
- Include dynamic texts and values such as price, and the percentage of discount
- Include static image, text, and values such as category, the name of the promoted brand, your logo etc.
How To Customise Your Dynamic Ads
To customise the appearance of your Facebook Dynamic Ads, you need to create a template first. The template will be applied on top of a product image. Think of it as a layer in Photoshop – Applying multiple layers leads to creating the end image.
Here is what you should have in mind when creating your template:
- The template should be exported in .png format, in a transparent background.
- It can be used for single image ads or carousel ads – in which case the template should be 1200 x 628 pixels and 1,080 x 1,080 pixels, respectively.
- You need to place the product in the centre, so this means that you are essentially creating a frame/border.
How To Create A Facebook Dynamic Ads Template
In this example, I used Photoshop to create the template, but you can do so with any image processing software. Here is the .png template I created to promote a black Friday sale.
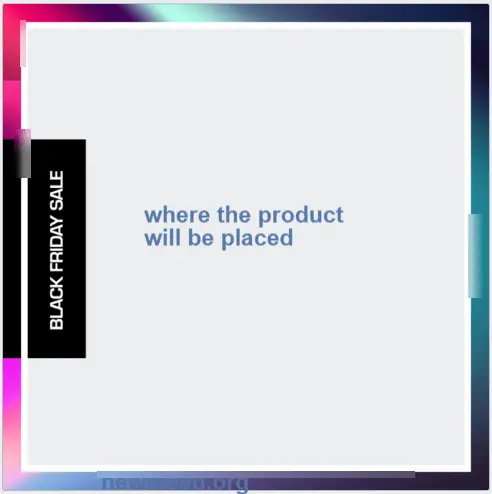
Your template should be simple, with as little extra decoration as possible, since we will be adding price/sale related info. I created a colourful border and added a “Black Friday sale” banner. Next comes the exciting part; applying the template and further customising your Dynamic Ads.
Applying A Custom Template To Your Dynamic Ads
Create a new Dynamic Ads campaign by choosing the Catalogue Sales objective and completing the process the way you usually do. Be sure to
- customise your product set to include the products that are part of the promotion.
- choose the right ad format based on your template (single image or carousel).
Once everything is set up, head over to the “Content” section and choose the “Creative Tools” option and next, the “Customise Images” button.
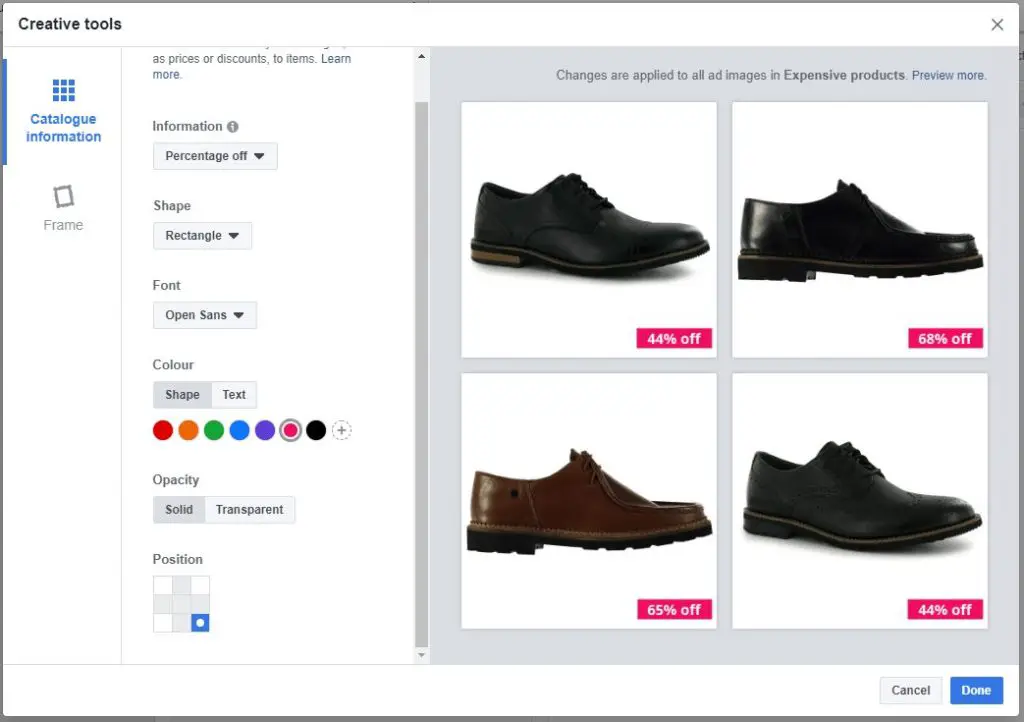
In the “Creative Tools” dialogue box choose “Catalogue Information.” Here you can choose from the following options:
- None
- Price
- Strikethrough price
- Percentage off
- Free delivery
In order to use any of the above options (2-4) you need to have the corresponding information in your product feed. If you don’t, and choose to include it, then the information won’t be displayed in the final ad. You can play with the different options for shape, font, colour, opacity, and position – and finalise how the catalogue information will appear.
When done, head over to the “Frame” tab. Here is where you will apply the template you created earlier.
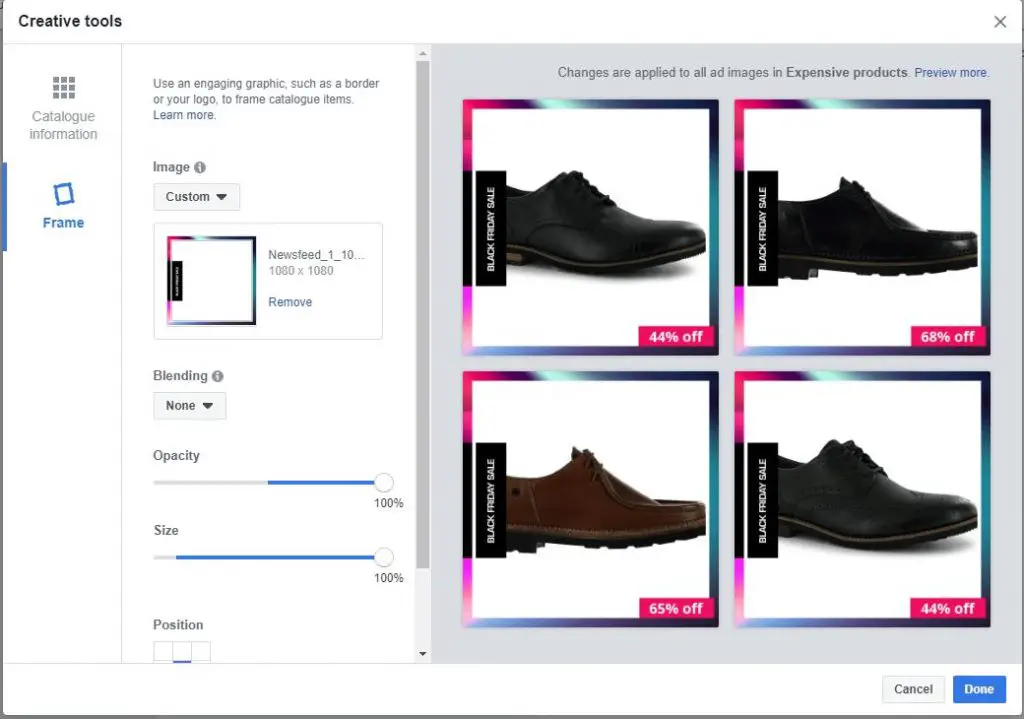
The process is pretty straightforward: Choose “custom” to upload your custom template. Play around with settings to customise the settings for blending, opacity, size and position. Be sure to check the preview on the right, to ensure that everything (template and catalogue info) looks fine, and complete the ad creation process the way you normally do.
Congratulations! You just created your first customised Facebook Dynamic Ad!

[box]Read next: How To Set Up The Right Facebook Pixel Events For Your eCommerce Website[/box]